When resurfacing a swimming pool with marbelite, the plaster layer underneath serves as the foundation. If the plaster isn’t applied correctly — with the right thickness, good bonding, and proper waterproofing — the marbelite layer won’t last, regardless of how well it’s applied.
This guide explains the ideal pool plaster thickness, the best waterproofing additives available in South Africa, how to prepare the surface, and recommended curing times before applying marbelite. Additionally, you’ll find a clear step-by-step process and answers to common questions about pool plastering.
Why Plaster Thickness Matters Before Marbelite
The plaster acts as the bonding layer between your concrete pool shell and the marbelite finish. If too thin, it may crack or wear through. Conversely, if it’s too thick, it can trap moisture, cause uneven curing, or even delaminate over time.
- Ideal thickness for new pools: 10–15 mm
- Ideal thickness for renovations: 8–12 mm
Consistency is key because uneven plaster thickness creates weak spots in the finish. Also, the aggregate size in the mix should be 0.150mm or smaller to ensure a smooth surface and prevent voids that might lead to water seepage.
Best Waterproofing Additives in South Africa
Given the high UV exposure, temperature fluctuations, and harsh pool chemicals common in South Africa, choosing the right waterproofing additive is essential. These additives protect plaster from water penetration, algae growth, and premature failure.
Commonly used waterproofing additives locally available include:
- Sika® Cemflex – a flexible acrylic-based waterproofing admixture ideal for swimming pool plasters.
- Bonding Liquid (Acrylic-based) – enhances adhesion between plaster and substrate.
- Sika® Latex® – improves water resistance and bonding strength in cement mixes.
- Drikon® Waterproofing Additive – an economical powder additive that reduces plaster porosity.
Mixing guideline: Most manufacturers recommend mixing 1 part additive with 2–3 parts water for plaster mixes. Always consult the product’s technical datasheet for exact ratios.
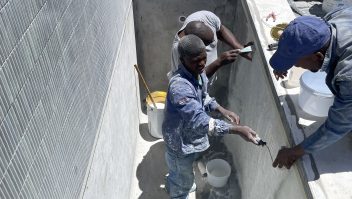
Step-by-Step Guide: Applying Pool Plaster Before Marbelite
Step 1: Drain & Inspect the Pool
Completely empty the pool and check for cracks, hollow spots, or structural damage. Repair these before plastering.
Step 2: Chemical Cleaning
Preparing the Pool Surface Before Resurfacing
For older or used pools, the surface must be cleaned and prepared properly before applying new marbelite or plaster. Here’s the process:
- Acid wash the pool with muriatic acid or a commercial pool acid cleaner to remove stains, scale, and buildup.
- Neutralise the surface with a soda ash solution to stop the acid reaction.
- Rinse well to remove all residues.
- If the pool was previously waterproofed with bitumen or DPM (Damp Proof Membrane), scrape or grind the coating off.
- Use a commercial adhesive remover or solvent like xylene, toluene, or a citrus-based degreaser to get rid of leftover bitumen or glue.
- Wash the surface with a strong alkaline cleaner such as trisodium phosphate to remove oils and residue.
- Rinse again with clean water.
- Apply a high-quality [Cemcrete Flex Bond] or other recommended premium bonding liquid designed to improve adhesion and waterproofing in cement mixes used for re-plastering.
- Let the pool surface dry completely before applying the new finish.
Step 3: Prepare the Surface
Chip away any loose or hollow plaster areas. Remove dust with a stiff broom or blower. Lightly dampen the surface to avoid rapid drying during plaster application.
Step 4: Mix the Plaster
Combine clean plaster sand, fresh cement, and the waterproofing additive. Maintain the recommended ratio of additive to water (1:2–3). Mix until smooth and free of lumps.
Step 5: Apply Plaster
Spread evenly to the correct thickness (10–15 mm for new pools; 8–12 mm for renovations). Work continuously to avoid visible joint lines.
Step 6: Smooth & Finish
Use a steel trowel to create a flat, even surface. Avoid over-trowelling, which can create a sealed surface that hinders marbelite adhesion.
Step 7: Curing Time
Allow plaster to cure for 24–48 hours before applying marbelite. In hot, dry weather, mist lightly with water to prevent cracking. Also, avoid standing water on the surface during curing.
Ideal Thickness of Marbelite Plaster for Pools
When applying marbelite, the recommended thickness is between 6 mm and 10 mm.
This range is not arbitrary—it is based on structural performance, durability, and workability:
- 6 mm minimum ensures a solid covering over the concrete shell, fully concealing the substrate and providing a uniform surface. Any thinner and the marbelite may not bond evenly, increasing the risk of cracking or delamination.
- 10 mm maximum prevents excessive shrinkage during curing. Applying too thick a layer in one go can cause stress cracks and uneven curing, especially in hot weather.
- At this thickness range, the plaster can be properly compacted into the surface, sealing tiny voids and ensuring a smooth, watertight finish.
- Thicker layers than 10 mm tend to trap moisture inside, which can lead to blistering, hollow spots, or premature flaking.
- Maintaining the correct thickness also allows for consistent colour and texture, as marbelite contains marble dust that must be evenly distributed.
Pro tip: In areas with high wear (like steps and shallow ends), applicators often lean closer to the 10 mm mark for added longevity, while deeper sections of the pool can be closer to 6 mm.
Why Proper Plastering Extends Marbelite Life
Well-applied plaster provides:
- Strong adhesion for the marbelite layer
- Enhanced waterproofing and chemical resistance
- An even surface for a smooth, aesthetic finish
- Longer service life, reducing costly repairs later on
FAQ Section
Q1: How thick should pool plaster be before marbelite?
For new pools, 10–15 mm is ideal. For renovations, 8–12 mm is sufficient if the pool shell is sound.
Q2: What is the best waterproofing additive for pool plaster in South Africa?
Popular choices include Sika® Cemflex, Sika® Latex®, Bonding Liquid, and Drikon®. They improve adhesion, reduce water penetration, and extend plaster life.
Q3: How long should pool plaster cure before applying marbelite?
Typically, 24–48 hours is enough. In cooler or more humid climates, curing up to 72 hours may be necessary.
Q4: Is waterproofing necessary before marbelite application?
Yes. Although marbelite is waterproof, applying waterproofing additives to plaster ensures extra protection against leaks, especially in hairline cracks.
Q5: Can I apply marbelite directly over old plaster?
No. Old plaster must be cleaned, repaired, and brought to the correct thickness to avoid peeling and adhesion problems.
Q6: Why is chemical cleaning important before plastering?
Chemical cleaning removes contaminants like algae, oils, and chemicals that can prevent plaster from bonding properly.
Q7: What issues arise if plaster is applied too thick?
Too thick plaster can trap moisture, leading to blistering, delamination, or uneven curing under the marbelite finish.
Why Proper Plaster Preparation is Essential Before Marbelite Application
Marbelite pool finishes require a stable, well-cured plaster base. Any plaster issues like cracking, uneven thickness, or poor bonding can lead to peeling or bubbling of the marbelite surface over time. This can result in costly repairs and affect your pool’s aesthetics and longevity.
Final Thoughts
For pool owners and contractors across South Africa — whether in Cape Town, Durban, Johannesburg, or beyond — getting the plaster thickness and waterproofing right before marbelite application is essential. These steps ensure your pool looks stunning and remains durable for years to come.
Internal Links
- Learn more about Marbelite Pool Finishes in South Africa
- Check out our guide on Pool Renovation Tips for Cape Town Pools
- Read about Waterproofing Solutions for Swimming Pools